


Introduction
What is Babel
From the official babel documentation site, Babel is a toolchain that is mainly used to convert ECMAScript 2015+ code into a backwards-compatible version of JavaScript in current and older browsers or environments. Basically, Babel is a Javascript Compiler.
This article aims to explain and show how we can use Babel to access latest ES6 and above syntax features that are not included in recent Node.js versions. If you are interested to learn how Babel works under the hood, I would be sharing some useful resources at the last section of the article.
Project Setup
Prerequisites
Before you can get started, make sure to have an installed editor and terminal on your machine. Also, you will need an installed version of Node.js with npm. Make sure to have everything set up before you continue to read.
We need to initialize our project with a package.json file since we are going to install some packages that are necessary for the setup
npm init -y
Note: For this tutorial, we will be making use of npm as our package manager. If you are using yarn, make sure you run the corresponding command.
After successfully initializing our node project we install necessary dependencies.
First, we install express a web framework for Node.js and nodemon a tool used to automatically restart Node.js applications when file changes are detected. Open your terminal and add the following snippets
npm install --save express
npm install --save-dev nodemon
Next, to install packages essential for babel setup.
It's advisable to install @babel/core @babel/cli as global dependencies.
npm install --save @babel/core @babel/cli
npm install --save-dev @babel/node @babel/preset-env @babel/plugin-transform-runtime @babel/runtime @babel/polyfill
@babel/core - a fundamental package to run any babel setup/configuration.
@babel/cli - A built-in CLI which can be used to compile files from the command line/terminal.
@babel/node - babel-node is a CLI that works the same as the Node.js CLI, with the added benefit of compiling with Babel presets and plugins before running it.
Note: You should not be using babel-node in production. It is unnecessarily heavy, with high memory usage due to the cache being stored in memory. You will also always experience a startup performance penalty as the entire app needs to be compiled on the fly.
@babel/preset-env- is a smart preset that allows you to use the latest JavaScript without needing to micromanage which syntax transforms (and optionally, browser polyfills) are needed by your target environment(s). This both makes your life easier and JavaScript bundles smaller.
@babel/plugin-transform-runtime - A plugin that enables the re-use of Babel's injected helper code to save on code size.
@babel/runtime - a package to be installed production dependency to avoid duplication across your compiled output.
Then, we need to create a babel config file in our project root directory .babelrc and write the configuration to it. feel free to add extra config to this file
{
    "presets": ["@babel/preset-env"],
    "plugins": [
        ["@babel/transform-runtime"]
    ]
  }
With this done, let's create a simple Node.js/Express server. Start by creating an app.js file in the project root directory then add the following block of code to it.
import express from "express";
import bodyParser from "body-parser";

const app = express();

app.use(bodyParser.json());
app.use(bodyParser.urlencoded({ extended: false }));

app.get("/", (req, res) => {
  res.status(200).json({
    message: "I am using babel in NodeJS",
    status: "success",
  });
});

const PORT = process.env.PORT || 4200;
app.listen(PORT, () => {
  console.log("server up and running");
});
We've come so far, Our setup is ready and it is time to run our code for babel to do its magic ✨
Open your package.json file and make the following modifications to the script tags.
The start script will be used to compile your application code into a lower version of javascript, node.js understands and can be readily deployed to a node.js production server.
The start:dev script can be used to run our code locally in your runtime.
The clean script will be used to delete the previous builds folder when the start script is run.
The build-babel script makes use of @babel/cli as explained earlier to compile code in the terminal.
Finally, the build script runs both clean and build-babel commands.
 "scripts": {
    "start": "npm run build && node ./build/app.js",
    "start:dev": "nodemon --exec babel-node ./app.js",
    "build": "npm run clean && npm run build-babel",
    "clean": "rm -rf build && mkdir build",
    "build-babel": "babel -d ./build ./app.js -s"
  }
To conclude, let's run the start script to make sure everything works.
After running the start script, a folder build is created in your project root directory containing the compiled app.js file as shown in the image.
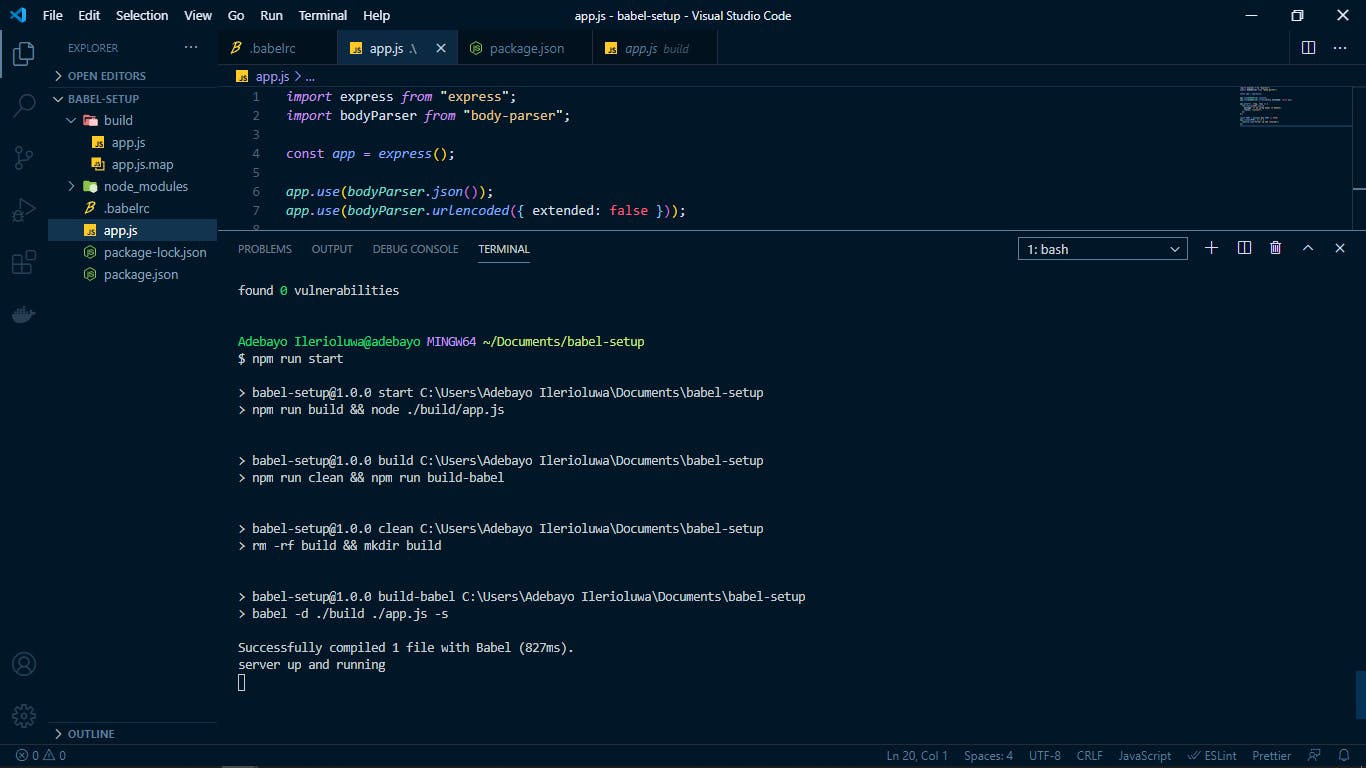
Now we can deploy our compiled application code to a node.js production server 🎉🎉.
Conclusion
We learnt how to configure Babel in our Node.js Project to compile lastest javascript features to compatible versions for browsers and other environments.
If you have any questions or feedback about this article, feel free to reach out. Thanks for reading.